From Injury To Inquiry
I clearly remember the moment when shooting pain in my back sent me down on my knees, unable to breathe. I remember the numbness and tingling in my right foot – no matter how much I commanded, my foot would not obey. As a physical therapist, I knew exactly what was happening, I just couldn’t believe it was happening to me. I was young, healthy, active and a dedicated yoga practitioner. How could it be that I had herniated a disc in my lower back? The fear surrounding any significant injury began to surface. My main question was, “Would I be able to stay active and do the things I love, the activities that fulfill my soul and inspire me daily?”
The doctor took one look at my MRI (revealing a significant disc herniation at L5-S1 with nerve root impingement) and told me I would have to modify my activities for the rest of my life. Knowing better, I began to heal my injury with what I loved most – yoga. Six years later, I am pain-free, enjoy a full practice with no limitations and help others overcome their injuries with therapeutic yoga.
What went wrong?
The injury and my subsequent self-inquiry forced me to look closely and honestly at the way I was practicing yoga and living my life. I became aware that I was performing asana (postures) the way I thought they should look. I was missing an inner awareness of how each pose could serve me and my body. I would repeatedly overextend my lumbar spine while avoiding opening up tight areas in my body, namely my hip flexors and external hip rotators. I also have a mild scoliosis, which creates some restriction in my thoracic spine. In backbends, I continuously used the flexibility in my lower back to push into what I perceived was a deeper pose, instead of backing off to create more movement in my chest and upper back. In addition, I was not engaging my lower abdomen correctly, which contributed to constant compression in the lumbar spine. I was able to practice, even with this imbalance, for a number of years until the straw broke the camel’s back. I herniated a disc after performing a deep forward bend.
My experience led me to develop a growing awareness that injuries are not necessarily caused by a specific pose or even the yoga; rather it is the way one consistently practices over time that creates the problem.
When I examined how I approached my life, I was forced to recognize the competitiveness I had with myself both on and off the mat. I have been a perfectionist for as long as I can remember and although competition can be healthy, it can be accompanied by self-directed violence and aggression when motivated by a feeling of not being good enough. In this case, I was never fully present in the moment because of constant striving for my perception of a ‘better’ version of the pose, and ultimately myself.
In Healing Back Pain, Dr. John Sarno states the personality type who most often suffers from back pain is one who appears calm on the outside but tends to internalize stress, putting a lot of pressure on themselves to succeed. This stems from a lack of trust in life and a lack of awareness that the universe supports us. Since the lower back is the support for the torso, it is no surprise my pain manifested there.
Finding Purna Yoga
After the opening Om of a daylong workshop on Yoga for Low Back Pain with Aadil Palkhivala, I knew I wanted to study with him. Purna Yoga, founded by Aadil and his wife, Mirra, offers many advanced and innovative therapeutic techniques. Aadil studied with BKS Iyengar from the age of seven and developed a system based on his work with Iyengar emphasizing awareness and alignment accompanied by applied philosophy, nutrition and transformative spirituality. Purna Yoga encourages the student to look deeper into the causes of injury and disease and to work with lifestyle modification and meditation in addition to asana to ensure complete and true healing.
Therapeutic Asana for Low Back Pain
When working with any injury, it is important to look at the cause by identifying areas of tightness, weakness and misalignment. In my case, the root cause was tightness in the hips, thoracic spine and chest as well as weakness in the core. I also needed to learn to be more present in my body, to feel what was happening instead of forcing into a pose.
The first and most important action to tearn to protect your back in all asana is the engagement of the pit of the abdomen, what Aadil calls the POA, the region between the belly button and the pubic bone. To protect the lower back, lift the POA toward your head, enabling the navel to move into the body and upward, helping the sacrum descend. This action creates length in the spine, relieves compression in the low back and protects the back during backbends and twists.
Although each individual is unique in her or his therapeutic needs, the following asana are generally safe and effective for individuals with sub-acute or chronic conditions. These are suggestions for back health, but remember that it is important to work with a yoga therapist who can evaluate you and design an appropriate program for your specific condition.
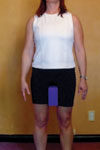
Tadasana (mountain pose) [pictured, above] is a wonderful place to start at any stage in the healing process. Placing a block between the legs facilitates opening the outer hips, strengthens the adductors and core, and relieves pressure in the spine. Place the block between the upper thighs and ground all four corners of the feet into the earth. Engage the thigh muscles and roll the thighs in toward one another, squeezing the block and moving it backwards. As you maintain the internal rotation in the thighs, lift the POA. Draw the shoulder blades away from the ears and keep the chest lifted. When working in harmony, this action helps the descent of the sacrum, places the pelvis in a neutral position and creates space between the lower lumbar vertebrae.
Most individuals with back pain and disc herniations have tightness in one or more areas in the hips. The hip muscles attach to the pelvis and the sacrum attaches to the pelvis via the sacroiliac joints. When the hip muscles are tight, the alignment of the spine is directly affected, especially during the performance of yoga asana. Most injuries and disc herniations occur in the lumbosacral area between L4-L5 and L5-S1. The Purna Yoga Hip Opening Series is a wonderful sequence of postures that increases range of motion in the hips in every possible direction along with traction. I have observed students and clients finding relief from years of back pain after practicing the sequence regularly. The Hip Opening Series is comprised of six postures that open the hip in flexion, adduction, abduction, internal and external rotation and extension. The following excerpts from the series are safe for most back conditions.
1) Supta Padangusthasana:
(Lengthens the hamstrings.) Lie on your back and place a strap in the arch of the left foot. Bring the left leg up and extend the right leg out. Engage both thigh muscles and press out through the right inner heel. Make sure the bottom thigh does not roll out to the side. Instead move the inner knee towards the floor so that the knee and toes point directly upward. If the top knee is bent, move the leg further away from the head and engage the thigh muscles. Keep both hip bones level. You should feel the stretch in the hamstrings, behind the left knee or thigh. If you feel the stretch in the buttock area, back off a little bit until the stretch moves out of the buttock and into the posterior thigh. Repeat on the other side and hold for six deep breaths.
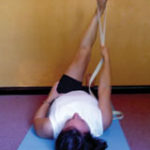
2) Parvritta Supta Padangusthasana:
[pictured, above] (Lengthens the external rotators of the hip.) Begin this in the same way as the previous asana but hold the strap in the right hand. Take the leg across the body so that the heel of the left leg lines up with the right shoulder, but no further. Press up through the left heel as you bring the left buttock down toward the floor. Hold for three breaths and repeat on the right.
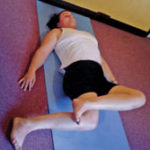
3) Hip Internal Rotation:
[pictured, above] (Increases internal rotation of the hip and stretches the psoas major, one of the hip flexors.) Lie on your back with knees bent and feet together. Step the right leg out to the side and let the knee fall toward the floor. Make sure the thighbone and shinbone are perpendicular to one another. Cross the left ankle over the right knee and allow the hip to come up off the floor. Strongly lift the POA toward the head and move the right thighbone away from the head. If there is any pain in the right knee, support it with a block. Hold for six deep breaths and repeat on the left. For all injuries, it is important to approach the healing process in stages for a complete recovery. All too often, we jump ahead to strengthening before the structure is properly aligned.
The five stages of healing:
> Re-Align: Identify what is tight and weak and correct it.
> Create Space: Open up the tight structures and surrounding connective tissue to reduce joint and nerve compression.
> Re-educate: Identify faulty movement patterns that contribute to the imbalances and learn how to move in a different way.
> Stabilize: Once the structure is aligned, stabilize.
> Practice: Be consistent for long-term results and transformation.
It is my belief and experience that injuries happen for a reason. Although, it may not be apparent at the time, if we can step back and see our pain as a gift, we can work on it with more acceptance, patience, and clarity. If our bodies send us a clear message, it presents an opportunity to reexamine the way we have been living our life physically, emotionally and spiritually. This can point us in the direction of making changes, enabling us to new levels of health and awareness. My injury certainly guided me to cease pushing toward my concept of perfection. It helped me learn to accept myself in this moment. It brought me face to face with my ego and insecurities. While neither easy nor pleasant, I am grateful for the ability to practice compassion and acceptance for myself and others.


